
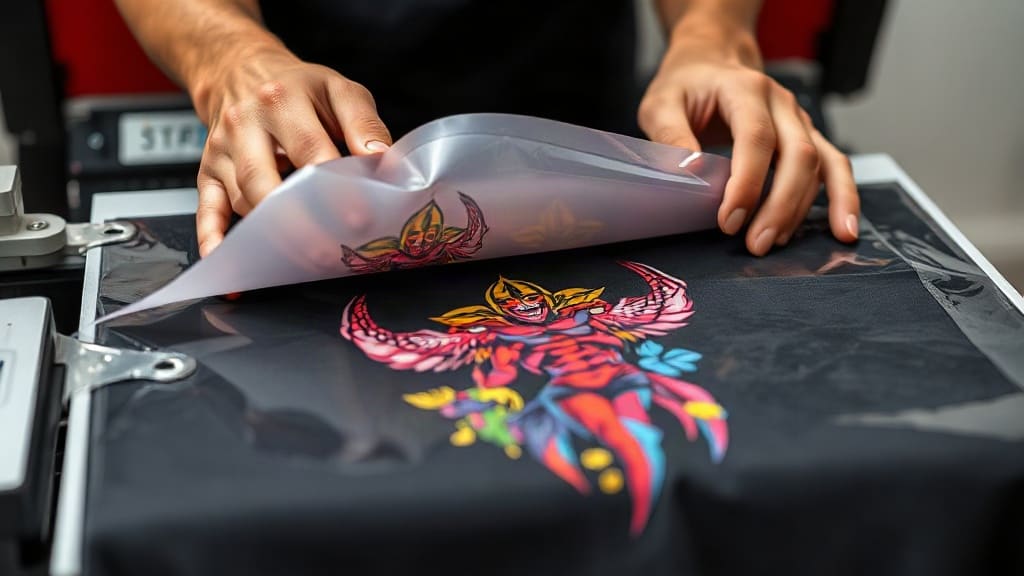
If you are new to custom apparel printing, DTF transfers might just be the easiest and most affordable way to start. DTF, which stands for Direct to Film, has taken the printing world by storm because it allows you to create vibrant, durable designs on almost any fabric without the hassle of weeding or complex setups. Whether you want to start a side hustle or simply print custom shirts for your family, this guide will walk you through every step of the process, from choosing the right materials to washing your finished garments.
In this article, we will cover the basics of what DTF transfers are, the equipment you need, how to print and apply them, common mistakes to avoid, and answers to frequently asked questions. By the end, you will have a solid understanding of how to produce professional-looking custom apparel right from your home or small studio.
What Are DTF Transfers?
DTF transfers are printed designs on a special PET film that you then heat press onto fabric. Unlike traditional screen printing, which requires a separate screen for each color, DTF printing uses a full-color inkjet printer to deposit ink onto the film. After printing, a layer of hot-melt adhesive powder is applied to the design. Once the powder is cured, the transfer is ready to be pressed onto a garment.
The beauty of DTF transfers is that they work on a wide range of materials, including cotton, polyester, blends, and even some nylons. They also produce a soft hand feel, which means the print does not feel heavy or plasticky on the fabric. This makes DTF a favorite among small business owners who want to offer high-quality custom apparel without investing in expensive equipment.
Essential Equipment for DTF Printing
Before you start printing your own DTF transfers, you need to gather the right tools. Here is a list of the essential equipment you will need:
- A DTF printer: This is typically an inkjet printer that uses white ink. You can convert some standard Epson printers to DTF, but many people prefer dedicated DTF printers that come with a white ink circulation system to prevent clogging.
- PET film: This is the special film that receives the ink. It comes in different thicknesses, but a standard 75-micron film is a good place to start.
- Adhesive powder: This is a hot-melt powder that activates when heated. It binds the ink to the fabric and gives the transfer its durability.
- A powder shaker: You can start with a manual powder applicator or invest in an automatic one for larger batches.
- A heat press: You will need a heat press to cure the adhesive powder on the film and later to press the transfer onto the garment. A clamshell or swing-away press works well for most applications.
- A curing oven or heat gun: Some setups use a curing oven to melt the powder evenly, but a heat press can also be used for small transfers.
If you are just starting out, you can purchase a complete DTF starter kit, which usually includes the printer, film, powder, and basic tools. This can save you money and ensure compatibility between components.
Step-by-Step Guide to Making DTF Transfers
Now that you have your equipment, let’s walk through the entire process of creating and applying DTF transfers. Follow these steps carefully to achieve the best results.
Step 1: Print Your Design
First, create or choose a design that you want to print. Make sure the design is mirrored because the transfer will be flipped when you press it onto the garment. Load the PET film into the printer with the rough side facing up. Print your design using the appropriate color profile and settings. For DTF, you will typically use a high-quality setting to ensure the ink is deposited evenly.
If your design has light colors or requires a white base, the printer will lay down white ink first, then the CMYK colors on top. This white layer is what makes DTF transfers opaque and vibrant on dark fabrics.
Step 2: Apply Adhesive Powder
Immediately after printing, shake a generous amount of adhesive powder over the wet ink. Cover the entire printed area completely. Then, remove the excess powder by gently tapping the film or using a powder shaker. The powder should stick only to the printed parts because the wet ink acts as a glue. The areas without ink should be clean of powder.
Step 3: Cure the Adhesive
Place the film into a curing oven or use your heat press to melt the powder. The temperature and time will vary depending on the powder you use, but a common starting point is 320°F (160°C) for about 60 seconds. The powder should melt and become glossy. This step is crucial because it sets the adhesive so that it will bond with the fabric later.
If you do not have a curing oven, you can use a heat press with a silicone sheet on top of the film. Press at the recommended temperature for a shorter time, but make sure the powder fully melts.
Step 4: Press the Transfer onto the Garment
Preheat your heat press to 320°F (160°C). Place the garment on the press and cover it with a Teflon sheet to protect the fabric. Then, place the transfer film with the design facing down onto the garment. Press with firm pressure for about 15 seconds. Remove the Teflon sheet and, while the film is still hot, peel the film away. You can do a hot peel or cold peel depending on the film type, but many DTF films require a hot peel for the best results.
After peeling, you should see a crisp, vibrant transfer on the fabric. For extra durability, you can press again for a few seconds with a Teflon sheet over the transfer to ensure full adhesion.
Common Mistakes to Avoid
Even experienced printers make mistakes when they first try DTF transfers. Here are some common pitfalls and how to avoid them:
- Not mirroring the design: Always mirror your image before printing, or your text will be backward on the final product.
- Using too little adhesive powder: If you do not cover the entire printed area with powder, the design may not stick to the fabric properly.
- Overcuring or undercuring: Each powder has specific curing requirements. Too little heat and the adhesive will not activate; too much heat can cause the powder to bubble or burn.
- Peeling too soon or too late: Follow the manufacturer’s instructions for peel temperature. Some films require a hot peel, while others need a cold peel.
- Using the wrong film side: Always print on the rough side of the PET film. The smooth side will not hold the ink properly.
Tips for Achieving Professional Results
To make your DTF transfers look truly professional, pay attention to these details:
- Use high-quality inks and films. Cheap materials can lead to poor color vibrancy and cracking after washing.
- Calibrate your printer regularly to ensure consistent colors.
- Store your film and powder in a cool, dry place to prevent moisture absorption.
- Test your press time and temperature on a sample fabric before running a full order.
- For dark fabrics, ensure the white ink layer is opaque enough to prevent the fabric color from showing through.
Washing and Care for DTF Transfers
One of the biggest concerns for customers is how long a DTF print will last. With proper care, DTF transfers can withstand many washes. Here are some washing guidelines to pass on to your customers:
- Machine wash in cold water and turn the garment inside out.
- Use a gentle cycle and mild detergent.
- Avoid bleach and fabric softeners, as they can degrade the adhesive.
- Tumble dry on low heat or hang to dry. High heat in the dryer can cause the transfer to crack or peel.
- Do not iron directly on the design. If needed, iron on the reverse side or use a pressing cloth.
By following these care instructions, your transfers can last for years without fading or peeling.
Why Choose DTF Over Other Methods?
You might wonder why you should use DTF transfers instead of other printing methods like heat transfer vinyl (HTV) or screen printing. Here are a few advantages that make DTF stand out:
- Full-color without screens: DTF allows you to print any design with gradients and multiple colors in one pass, unlike screen printing which requires setup for each color.
- No weeding: Unlike HTV, there is no tedious weeding of excess material. The design is ready to press right after curing.
- Soft hand feel: The transfer layer is thin and flexible, making it comfortable to wear.
- Versatility: You can print on a variety of fabrics, including those that are tricky for other methods.
- Cost-effective for small batches: DTF is perfect for short runs and custom orders because there are no minimum quantities or screen setup fees.
Of course, screen printing is still more economical for very large orders, but for a small business or hobbyist, DTF offers an unbeatable combination of ease and quality.
Frequently Asked Questions
Can I use DTF transfers on dark fabrics?
Yes, DTF transfers work exceptionally well on dark fabrics. The white ink base ensures that your design remains opaque and vibrant, even on black or navy garments. When printing for dark fabrics, make sure your design includes a white underbase, which is automatically applied if you use a DTF printer with white ink.
How long do DTF transfers last?
With proper care, DTF transfers can last as long as the garment itself. The adhesive bond is strong, and the ink is resistant to cracking and fading. In independent tests, DTF prints have been shown to withstand over 50 washes without significant degradation, provided you follow the washing instructions.
Do I need a special printer for DTF?
Yes, you need a printer that can print white ink. Some regular inkjet printers can be modified, but it is recommended to invest in a dedicated DTF printer with a white ink circulation system to avoid clogs and ensure consistent quality. These printers are available in various sizes, from desktop models to large-scale production machines.
Can I use DTF transfers on polyester?
Absolutely. DTF transfers are suitable for 100% polyester and blends. However, you need to adjust your press time and temperature because polyester is more sensitive to heat. Use a lower temperature and a shorter pressing time, and always use a Teflon sheet to protect the fabric from direct heat.
How do I remove the film after pressing?
After pressing, wait a few seconds and then peel the film away. The exact peeling time depends on the film manufacturer. Some films are designed for hot peeling, meaning you peel immediately while the film is still hot, while others require a cold peel. Always check the instructions that come with your film to achieve the best results.
If you follow these guidelines, you will be able to create beautiful, durable custom apparel using DTF transfers. Start with small projects, practice your technique, and soon you will be producing professional-quality prints that your customers will love.